Tuesday, January 19, 2010

Blowtorh, first experience, finally!!!

WARNING!!!

This post might show one dangerous cooking technique, so please read it carefully before you try to do it. This post is only based on my personal experience & might be only applicable for an exactly the same equipment that I used; please look for other trusted references or some professional advise.

Sound excessive? Yup, that’s me alright … hey better excessive than sorry, right??


I bought this blowtorch equipment about … hmm a year, one and a half year a go maybe, I cannot really remember. But, I always feel too scare of using it, so I just let it sat on my storage until I baked my first cheese cake last Saturday.

Equipment:
First the blowtorch it self, I cannot really tell what a good blowtorch would be, I bought this coz I think it made from good material, it looks save & has a lighter attached with it. I think it saver to use the one with attached lighter than if you have to use a match.

Second, the liquid gas. Make sure you buy a Liquid Gas Tube specially made for blowtorch. Do not use the usual liquid gas for the portable gas stove.


Third, it's optional to use a lazy suzan.

Area:
Do it in a good air circulation area but not windy, open the window if necessary. Keep aside from flammable material. Do it away from children or pet, If you got any ;p. If you had some concentration problem like I do, do it in a quiet place, a noisy place makes you hard to listen if any gas leak occurred. Make sure it has a good lighting, but not too much, too much light will make you hard to see the welding flame.

Method:

Take a moment to pray ... ;p

Read the all the instructions on the liquid gas tube & the blowtorch.

Attached
the blowtorch to the liquid gas tube, mine until it "click".

Put
your cake on the lazy suzan.

Turn handle
counter clock-wise/ to the left, or to the "+" sign, you will hear gas hissing.

Push the lighter
, the welding flame will appear, keep your eyes on it, coz sometime it hard to be seen.

Turn the handle
left & right to get the suitable welding flame for you, keep it stable.

Start blow torching.

Make sure
the blowtorch not to close with the cake/meringue, coz it will easily burnt, the flame actually longer than it looks. So, from a far than closer, closer, until you see the burnt effect on the meringue. You'll know the right distance to do so.

It will be better
& easier to turn the lazy suzan or the cake than to move the blowtorch around the cake.


Do not shake the gas tube to hard, coz it makes the flame goes unstable. Shake it smoothly.

Turn of the gas
, by turning the handle clock-wise, or to the "-" sign. Make sure you don't hear any gas hissing.

Remove
the blowtorch from the gas tube.

Hufffhh ... you've done now!

Baked Potatoes & Cheese

After baked my cheese cake last Saturday, I baked a dish also contain cheese in it. Some cheesy weekend I had, Don’t you think so? I bake this dish while waiting for my cheese cake to be chilled. So simple, but since it contain cheese, I guarantee this is one tasty dish … trust me!

Actually, I baked this dish coz I have to use 2 packs of Kraft Quick Melt that will be expired in February. I know you might think what a lousy person I am. But hey, is on the discount when I bought it back then, imagine 2 packs for only 1 pack price. You must be kidding me, if you can stand not to buy those …

Okay back to the dish … at fist I have no idea what to do with it. But you know Kraft pack always comes with a recipe in it. So, I decided to bake it with some potatoes, with a bit of modification of course.


Ingredient:
6 small size potatoes wash it cleanly, cut in four, peel if you want, Idon't
100 gram of minced beef
½ onion, chopped
Salt & pepper
Water to boil the potatoes
3 table spoon of vegetable oil
1 tea spoon finely chopped salary
1 pack of Kraft Quick Melt, about 180 gram, grated/mashed
Margarine/margarine to greased

Method:
Preheat oven for 190 Celsius.
Heat oil in a pan; add in the onion, stir fried until it goes translucent, add the minced beef, sat & pepper, stir fried until the beef is perfectly cooked, set aside. Boiled the potatoes with some salt for about half an hour until it becomes soft. Greased a casserole dish with a bit of butter or margarine, arrange potatoes sprinkle with salary, cooked minced beef, and last the cheese. Baked for 15-20 minutes. Serve warm. Please don’t leave your chili sauce behind while enjoy this dish … ;p


If you've seen some burnt part on the dish, I did that on purpose, coz it create a wonderful aroma when it burnt a little bit. Imagine kaastengel cookies ....

Remarks: on the pack of the Kraft quick melt it said that it melts of 175 Celsius, but it didn’t happen on my oven, it melt on 190 Celsius.

Now, I have to think what to do with the other pack. Got any idea??

Saturday, January 16, 2010

Baked Cheese Cake

It's hard for me to decide the title of this post ... is it "Baked Cheese cake" or "New York Cheese Cake" ?. So I browse around the web to find what is the signature of the "New York Cheese Cake". And I could not found what actually the different between the New York Cheese Cake & any regular baked cheese cake, everyone always seem to have their own version of New York Cheese cake. But most of them use cream cheese & sour cream as their base cream material & their always refer to a very creamy cheese cake.


So, I decided to use the title "Baked Cheese Cake", first reason, as I said before, I could not found the signature of New York Cheese Cake, & second I use Neufchatel Cream cheese, most of the NY cheese cake recipe on the web use regular cream cheese. So it's not fare to use the name New York Cheese cake.

This recipe taken from the cheese cake book from Yasaboga. They named it New York Cheese Cake, but I'm not using the name coz the two reasons above.

Cruz:
120 gram of crushed digestive cracker
75 gram of melted butter

Cheese cake:
375 gram of cream cheese (I use neufchatel cream cheese)
100 gram of sour cream
125 gram of castor sugar (I use powdered sugar)
2 whole eggs
1 egg yolk
15 gram of cake flour
2 tea spoon of lemon zest

this was my addition
Sugar icing: 1 egg white, 125 gram sugar,30 cc of water, a pinch of cream tartar.

100 gram of Strawberry jam, 2 table spoon of water & a pinch of gelatine powder, heat until it emulsify finely.

Method:
Preheat oven 175 celcius.

In a mixing bowl combine the cracker crumbs and melted butter. Press firmly into the bottom of a greased 18 cm round spring form pan. Refrigerated about 1 hour.

In large bowl cream the sugar & cream cheese untill smooth, use the low-medium speed. If you use big stand mixer like kitchen aid, use the creaming beater. Add in flour then eggs & egg yolk, continue mixing, last add lemon zest & sour cream.

Pour the cream cheese batter to the pan, bake au bain marie for 45 minutes. Turned of the oven, open the oven door about 1-2 cm, let it cooled completely. about 1-2 hour. Refrigerated for 4-8 hour untill completely firm.

For the Sugar icing:
Make the sugar syrup from the sugar & water, add cream of tartar to the syrup. Beat egg white until peak, pour the sugar syrup while it's hot. The batter will be smooth again, beat until soft peak.

Decored the side of the cooled cheese cake with the sugar icing & blow torched it. Add topping. Refrigerate for one hour before serving.


So that my friend, my first baked cheese cake ....

Thursday, January 14, 2010

I don't have facebook account !!

"Are you on facebook?" , "Do you have facebook account?", common thing to ask nowadays . I will say "nope" proudly with smile on my face & people gonna immediately attack me with the question "Why?" then smile on my face will gone in no time, replaced by "should I answer the question?" face, & I tell you that is a rhetorical question, coz whatever my answer are they will start to defend their facebook existance with 1001 reasons, belive me, I know, I just know ... So, why should I answer it anyway. Sound cynical? Maybe ...

Some people, extremely said that is a social suicide not having facebook account, hahaha ridiculous. I'm feeling very much alive anyway without facebook ....

So here, I'm not gonna tell you why I don't have facebook account with all its reason. But if you do ask, I will answer it with "I just don't want to" with no following comment after it.

This is a graph by graphjam


Which color am I? Can you guess .... ;)

Monday, January 11, 2010

Hari Minggu di Pabrik Keju, Yummy Cooking Demo

Hari minggu kemarin aku ikutan acara demo masaknya Yummy. Seneng banget, karena udah lama ngga ikutan acara-acara yang berhubungan dengan masak memasak. Apalagi ini diadakan di pabrik kejuu … hehhehe ……

Sekilas sejarah Yummy: (diambil dari website Yummy)
Pembuatan keju Yummy dimulai pada tahun 1988 di Bali dalam skala kecil. Produk pertama nya berupa dadih putih (Curd Cheese), Gumpalan keju Feta (Feta Cheese) dan bermacam-macam keju bumbu segar (Fresh Spiced Cheese). Produk ini dapat dinikmati di restaurant dan hotel dari kuta, Sanur sampai ke Ubud dalam bentuk bermaca-macam cheese cake, keju Feta untuk salad yunani yang terkenal, dan olesan keju segar gurih yang dicampur dengan bawang putih, lada hijau, atau lada hitam dari Gunung Agung.....

Di acara demo tersebut kita diajarin masak 5 resep yang mengggunakan bahan keju oleh chef Cahyadi, yaitu Yummy Cheese Muffin, Yummy fruit yoghurt pudding, cheese cup cake, Yummy fetah chicken breast and baked potato & cheese. Sayang yang terakhir aku lupa foto ;p, soalnya keburu lapar, trus masuk perut deh …… ;p

Selain demo masak Yummy juga memberikan product knowledge, sekaligus pengetahuan tentang keju terutama keju muda atau soft cheese oleh marketing PT. Yummy, sayang aku lupa nama mas-nya …. Dia lebih mirip anak band loh dibanding orang yang kerja di pabrik keju …

Berikut sekilas pengetahuan tentang soft cheese oleh mas yang mirip anak band ini. Updated: ternyata namanya Mas Sofyan .... makasih mbak Tety.

Soft cheese sebaiknya disimpan di suhu 2-4 derajat Celcius.
Kalo di kulkas rumah, sebaiknya disimpan di chiller, itu loh rak yang tepat di bawah freezer, yang biasa untuk menyimpan ikan atau daging. Salah satu larangannya buat soft cheese ini, yaitu jangan disimpan di freezer, karena air & lemaknya akan berpisah di mana air akan mengkristal & teksture dari soft cheese tersebut akan rusak & tidak akan bisa recovery. Kalau tidak ada chiller, sebaiknya keju di simpan di kulkas jangan di dekat lampu karena relative lebih panas atau di rak bagian pintu, karena suhunya fluktuatif apabila kulkas dibuka-tutup.

Soft cheese hanya akan bertahan 1-2 jam di suhu ruang, setelah itu harus langsung digunakan

Secara kasat mata, soft cheese dapat dikatakan layak pakai apabila tidak terdapat bintik-bintik, biasanya berwarna hijau, hitam atau abu-abu, karena bintik-bintik itu merupakan spora atau jamur, yang sudah mulai tumbuh. Kadang juga bisa berserabut seperti jamur tempe.

Hal kasat mata lainnya adalah, soft cheese masih layak pakai apabila bagian permukaan & bagian dalamnya masih bewarna & berteksture sama.

Soft cheese masih layak pakai apabila baunya normal. Apabila ada bau tidak sedap seperti tengik atau terlalu berbau asam, maka keju sudah tidak layak pakai.

Selalu gunakan alat-alat yang bersih dalam mangolah keju, untuk menghindari tumbuhnya jamur apabila sisa keju masih ingin disimpan.

Expired date dapat diabaikan apabila tidak terdapat tanda-tanda di atas. Artinya walaupun sudah lewat expired date-nya masih bisa digunakan selama tanda-tanda di atas tidak muncul. Cuma kalau ragu lebih baik jangan digunakan yaahhh …..

Expired date dapat diabaikan apabila telah timbul tanda-tanda di atas. Artinya walaupun expired date belum lewat apabila tanda-tanda tersebut sudah muncul maka soft cheese tidak dapat digunakan. Kemungkinan soft cheese rusak karena suhu tidak terjaga saat pengiriman atau penyimpanan.

Produk-produk Yummy, bisa diretur atau ditukar apabila rusak sebelum tanggal expired date-nya. Silahkan diretur di tempat pembelian atau di pabrik Yummy.

Bakalan berguna sekali nih pengetahuannya …..

Selain demo masak & pengetahuan tentang soft cheese peserta juga dapet celemek yummy, 1 produk yummy bisa pilih sendiri & bisa beli produk Yummy dengan harga pabrik … sempet kalap juga liat harganya yah … bayangkan mascarpone-nya cuma 30 ribu per cup … sayang ngga jadi beli karena di rumah ngga punya fresh cream kalau mau buat tiramisu. Akhirnya aku beli Neufchatel & sour cream masing-masing satu cup plus Yofit Yoghurt 3 botol per 180 ml. Untuk produk yummy gratisannya, aku pilih Neufchatel juga, & hadiah 1 fetah cheese, karena jadi salah satu yang datang paling pagi. Padahal datang kepagian karena takut nyasar & sebenernya udah sempet nyasar, untung nyimpen nomer telepon pabrik Yummy, jadi ngga nyasar-nyasar amat. Hehehhe …

Sekarang sedang menyusun rencana nih, mau dibikin apa yaahhh oleh-oleh dari pabrik Yummy..

Oke, teakhir aku mau say hai sama Mbak Tari, nice to know you mbak & Mbak Camelia yang blog-nya aku suka banget, sama teman-teman yang lain yang ngga sempet tau namanya satu per satu … maafkan yaahhh ….. satu lagi mbak Tira yang sampe aku pangling soalnya “terpaksa” dandan cantik supaya anaknya mau ditinggal, bilangnya sih mau kondangan ….. hehehhe ada-ada aja…….

Ya begitulah hari minggu yang menyenangkan di pabrik keju ……

Banana Crepes Pudding

Udah dipikir-pikir agak lama untuk ikutan banana week tapi bingung juga mau bikin apa. Entri-entri yang masuk di milist NCC nambah bingung, karena banyak yang udah bikin banana cake dengan keunikannya sendiri. Mau bikin muffin, udah pernah bikin muffin pake pisang.
Akhirnya, bongkar-bongkar buku resep, ada 1 buku pemberian teman yang belum satu pun resep di situ yang pernah aku coba. Eh, ada resep yang pake pisang. Aku pikir menarik juga resep ini, karena sepertinya belum ada yang bikin - tapi ngga tau juga kalo udah ada,emailnya membludak sih -. Hal, menarik lainnya adalah karena aku punya crepes pan yang sama sekali belum pernah dipakai untuk bikin crepes atau kulit lumpia, malah buat manggang udang. Sepertinya, ini saatnya dia diberdayakan sesuai fungsi aslinya .... ;p


Bahan Crepes:
Tepung terigu 75 gram
Susu cair 180 ml
GUla halus 25 gram
Mentega 30 gram lelehkan
Baking powder 1/2 sdt - aku ngga pake
Telur 1 butir
Garam 1/2 garam

Bahan Isi:
Pisang raja 400 gram, haluskan dengan garpu kasar saja
Susu Cair 100 ml
Krim kental 50 ml
Tepung maizenna 2 sdm, larutkan dengan sedkit air
Garam 1/2 sdt
Gula pasir 50 gram

Bahan Topping untuk 1 resep:
Susu cair 200 ml
Krim kental 100 ml
2 butir telur
Kuning telur 1 butir - aku ngga pake
Gula pasir 50 gram
Almond 50 gram

NB: aku menggunakan loyang brownies 10x20 cm, dialasi alumunium foil & hanya menggunakan 1/2 resep bahan toping, aneh juga padahal bahan crepes & isi 1 resep loh .... beda loyang mungkin yah ....

Untuk crepes: Aduk semua bahan hingga rata, saring agar halus. Panaskan pan crepes buat dadar tipis, lakukan hingga bahan habis. Sisihkan. Aku buat 8 buah crepes

Untuk Isi: Campur semua bahan isi dalam panci, masak sambil diaduk hingga mendidh & mengental. Angkat, dinginkan.

Ambil satu lembar crepes lalu isi dengan kira2 2 sdm bahan isi, ratakan di atasnya. Gulung, hingga padat. Lakukan hal yang sama hingga bahan habis.

Tata gulungan crepes dalam loyang, sisihkan.

untuk topping: Campur semua bahan topping kecuali almond, aduk hingga rata. Siramkan campuran topping di atas gulungan crepes, taburi almond slice

Panggang suhu 160 derajat celcius selama 35 menit hingga matang. - aku karena takut gosong dengan au bain marie selama 30 menit. 15 menit panggang biasa.

Sunday, January 10, 2010

Don't be angry man, let just sing

Yeeeeaaahhhh talk to the hand.
I think this will be my motto for this week.
I got this picture from my friend's blog Majang


"Don't be angry man, let just sing"

Thursday, January 7, 2010

2100 2101 .... ohhh whatever ........

You know I got a bad thing happen to me this year, sound too much yay? ;p
OK, I know you might be laughing at me on this...

You know what?

I cannot write "2010" correctly in first attempt ... I always write "2100" or or "2101" & if I realize it earlier while I'm writing or typing, I write "21" already, and afterward I got confused for about 1 or 2 seconds, thinking how I'm gonna write this correctly.

See the title... I was not making it up .. that my first attempt & the second is still incorrect ....

What is that, some minor dyslexia? I have no idea....

Tuesday, January 5, 2010

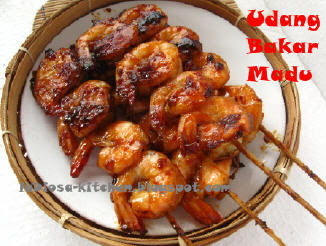
Udang Bakar Madu

Udang bakar madu or honey bbq shrimp, actually was my new year evening dish ... I was tried to recreate the one dish at my parent favorite restaurant Mang Engking. When the first time I tried this dish, I said to my self "This is not too hard to make" ... you know everyone that love to cook always say that to their self .... ;p


Suprisingly this dish is easy pizy to make, the key to good sea food dish is the freshness of the main ingredient .... that's it !! Coz sea food is already taste good when it drop from heaven by God ... yup I think so ... I think so ....

Ingredient:
500 gram of medium size shrimp, or about your fore finger, you can remove or keep the head, & scratch the back.

2 garlic, finely chopped
1 tea spoon chopped ginger (optional)
3 table spoon of oil for stir frying

Marinate sauce:
3 table spoon of tomato sauce
3 table spoon of oyster sauce
1 table spoon sweet soy sauce
2 table spoon of honey
1 table spoon of chili sauce, add more if you like it hot
salt to taste

Method with crepes pan:
In large bowl mix tomato sauce, oyster sauce, honey, chili sauce & salt. Marinate shrimp in the sauce mixture for at least 30 minutes. Stir fried the garlic & ginger. Add in the marinated shrimp, continue stirring until shrimps are cooked. Thread the shrimp onto skewer, 4 for each skewer. Since I don't have bbq grill, I use crepes pan to get the burning effect. Brush frequently with reserved marinade.


Method with bbq grill:
In large bowl mix tomato sauce, oyster sauce, honey, chili sauce & salt. Stir fried the garlic & ginger, add into the marinate sauce. Marinate shrimp in the sauce mixture for at least 30 minutes. Thread the shrimp onto skewer, 4 for each skewer. Grill until the shrimp cooked. Brush frequently with reserved marinade.

Monday, January 4, 2010

A very good quote

I just logged in to my Yahoo Messenger this morning & I found a very good quote ....


"Surga di telapak kaki ibu"

in English would be

"Heaven lies under your mother feet"


I don't have any comment, I just want to hug my Mom .

MUI : Halal Product List

To those of you who concern about Halal food, this link might be very useful:

Daftar produk Halal MUI.


This for product that sold in Indonesia.

LinkWithin

Related Posts with Thumbnails